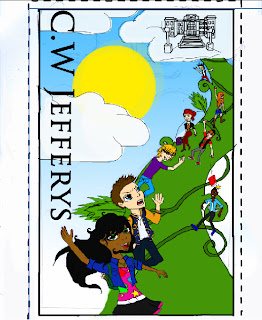
Agenda Cover Assignment
Explanation
Working on
the agenda cover, is a very difficult yet fun process. I had actually enjoyed
working on this assignment because this assignment, had allowed me to use many mediums
that I am already accustomed to and the process itself had provided many
challenges but eventually I had solved those challenges. This assignment had
required me to use the computer to complete this assignment. Although most of
the work has been completed on the 10% of this assignment was completed by
hand, for example, I had completed the final and rough copy on paper, and had
sketched countless of ideas on my sketchbook.
Process
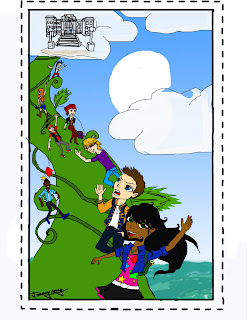
This is my final sketch for the agenda cover. This sketch took me the whole class period to complete this. I enjoyed working on this sketch because it was pretty fun to do, and I had mainly paid attention toward the characters eyes, because the eyes are the most important detail of the character, because it is the utter most thing you see, when you look at the character. What I would change in this sketch was taking more time to work on the hands, because I have difficulty drawing them, and the hands that I drew turned out awkward and disfigured.

This is the outlined copy of my agenda drawing. I had basically traced over the drawing I did on Photoshop. The only difference between the sketch and the outlined copy was that I had redone the clouds and had adjusted the characters drawing. One of the characters that I had adjusted was the girl on the way far left and the Mohawk guy sitting on the beanstalk. Out of the two characters I had changed, the girl was changed significantly. I had decided to redraw the girls hair on Photoshop because her hair had looked out of place. I had also fixed both characters face by changing their eyes and redrawing their head.
-Colouring the Characters-
After outlining the characters in Photoshop, I had begined to start colouring the characters using the brush and bucket tool. By making individual layers for the characters, it was easer to colour the characters individually. In total I had made at least 2-3 layers for each individual character. The first layer is the outline each character, the second layer is either the outline of their hair, and the third layer is dedicated to colouring the character.
Here is a example of how I had coloured the character:
The picture above is the sketched version of the girl.
This is the full outlined version of the girl behind the sketch layer.
This is the outlined layer of the girl without the outlined hair layer.
This is when I had combined both layers.
I had coloured the skin and clothes in this layer.
This is the final result of what the character looks like after finishing colouring the jacket, hair, shirt, the eyes and mouth.
-Reference-
Drawing the characters for this sketch had been very easy but when it comes to deciding either what the characters should wear, I had gone to the internet for reference to help me decide what my characters should wear. Hear are pictures that I had used as reference to help me determine what my characters are wearing:
This image above is an colour scheme, I did to help determine what kind of hair colour suits the guy best. I had eventually decided to go with the brown hair, because it suited the character the best and the colour brown also helps bring out the colour of the eyes.
After colouring all the characters in Photoshop, I had started colouring the background. Colouring the background was pretty challenging because I do not know how to colour on Photoshop, and I had wanted to make the beanstalk realistic, by shading it but eventually abandoned the idea because it was to complicated. Instead of focusing on adding amounts of detail, I had decided to make it look flat by not adding any shades or shadows to preserve an more flat and simple look.
Background Process
This is an image of the beanstalk coloured.
This images shows the result of the vines coloured.
In this image I had used the gradient tool to create the background. After using this tool I had noticed that my work was almost coming together , and was satisfied with that result at that time
After completing the sky of the background, I had started the painting the land using the brush tool in Photoshop.
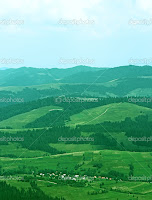
Working on the painting the land on Photoshop was the most challenging task while working on the agenda. Working on the landscape on Photoshop was really difficult, because I have had a difficult time deciding what the land should look, where it should be positioned, and wonder if it would fit/blend in with the character and beanstalk. I had used the image at the right as reference, because I think it matches the current landscape that I imagined so I used this image as an inspiration for the land of the agenda.
After completing the background I had started painting the school in Photoshop.
This is the outlined version of the school.
This is the final result of the school. Colouring the school was not difficult at all, because I had based this drawing on a image of a school and had used those same exact colour to determine the colour of the school.
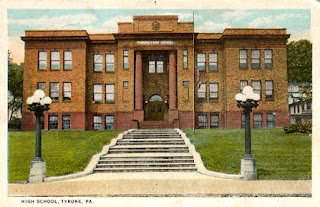
I had based the design of the school in my agenda on both of these images I found above, because drawing my school, C.W Jeffreys has had been too difficult to draw, so instead I had used both of these images of the school above as an reference to help me draw the school.
After finishing completing the school I had focused my time in class on the sun.
I had made 2 layers dedicated to the sun. In the first layer I had made the sun bold, and bright and had moved this layer behind the cloud layer.
I then went on my second sun layer and had expanded the size of the brush and had lowered the opacity and painted around the sun. I then moved the second layer behind the first layer.
Title positions Ideas
Before adding title After adding title
Because
this was my first attempt to color anything using the program Photoshop,
coloring my assignment, has been very difficult. As I got used to the the surroundings of Photoshop, coloring my characters and backgrounds has had
become less stressful and had became easier as I continue to work on this
assignment.
The most enjoyable process while working on this assignment was when I was painting the whole characters of the agenda. This part of the process was very enjoyable because it was the most easiest of all of the process and also it was very rewarding seeing the characters coloured because the characters seems to have more personality after finishing colouring the characters.
In conclusion this was one of the most enjoyable assignment I had ever done because I had spended the most time on this assignment then any other work on Photoshop, and had gained many knowledge that are valuable, for colouring on Photoshop.


